Forging and construction
A Japanese blade is steel that has been chosen, folded, combined and hardened. This topic follows the forge from the iron sand to the groove of the hi, and separates what is known from what is merely repeated: what folding really does, why the catalogue of constructions is a model and not a fact, what it means to see the core, and what the quench leaves in the blade.
From river iron to steel: the tatara and tamahagane
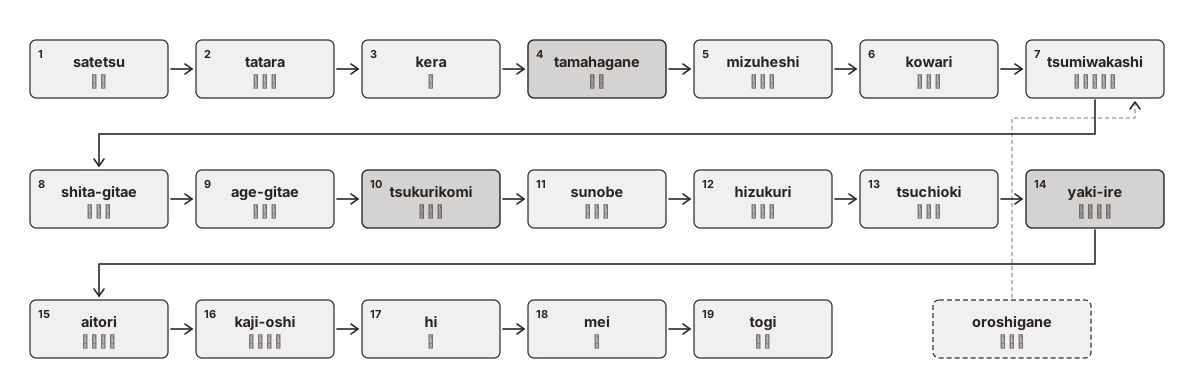
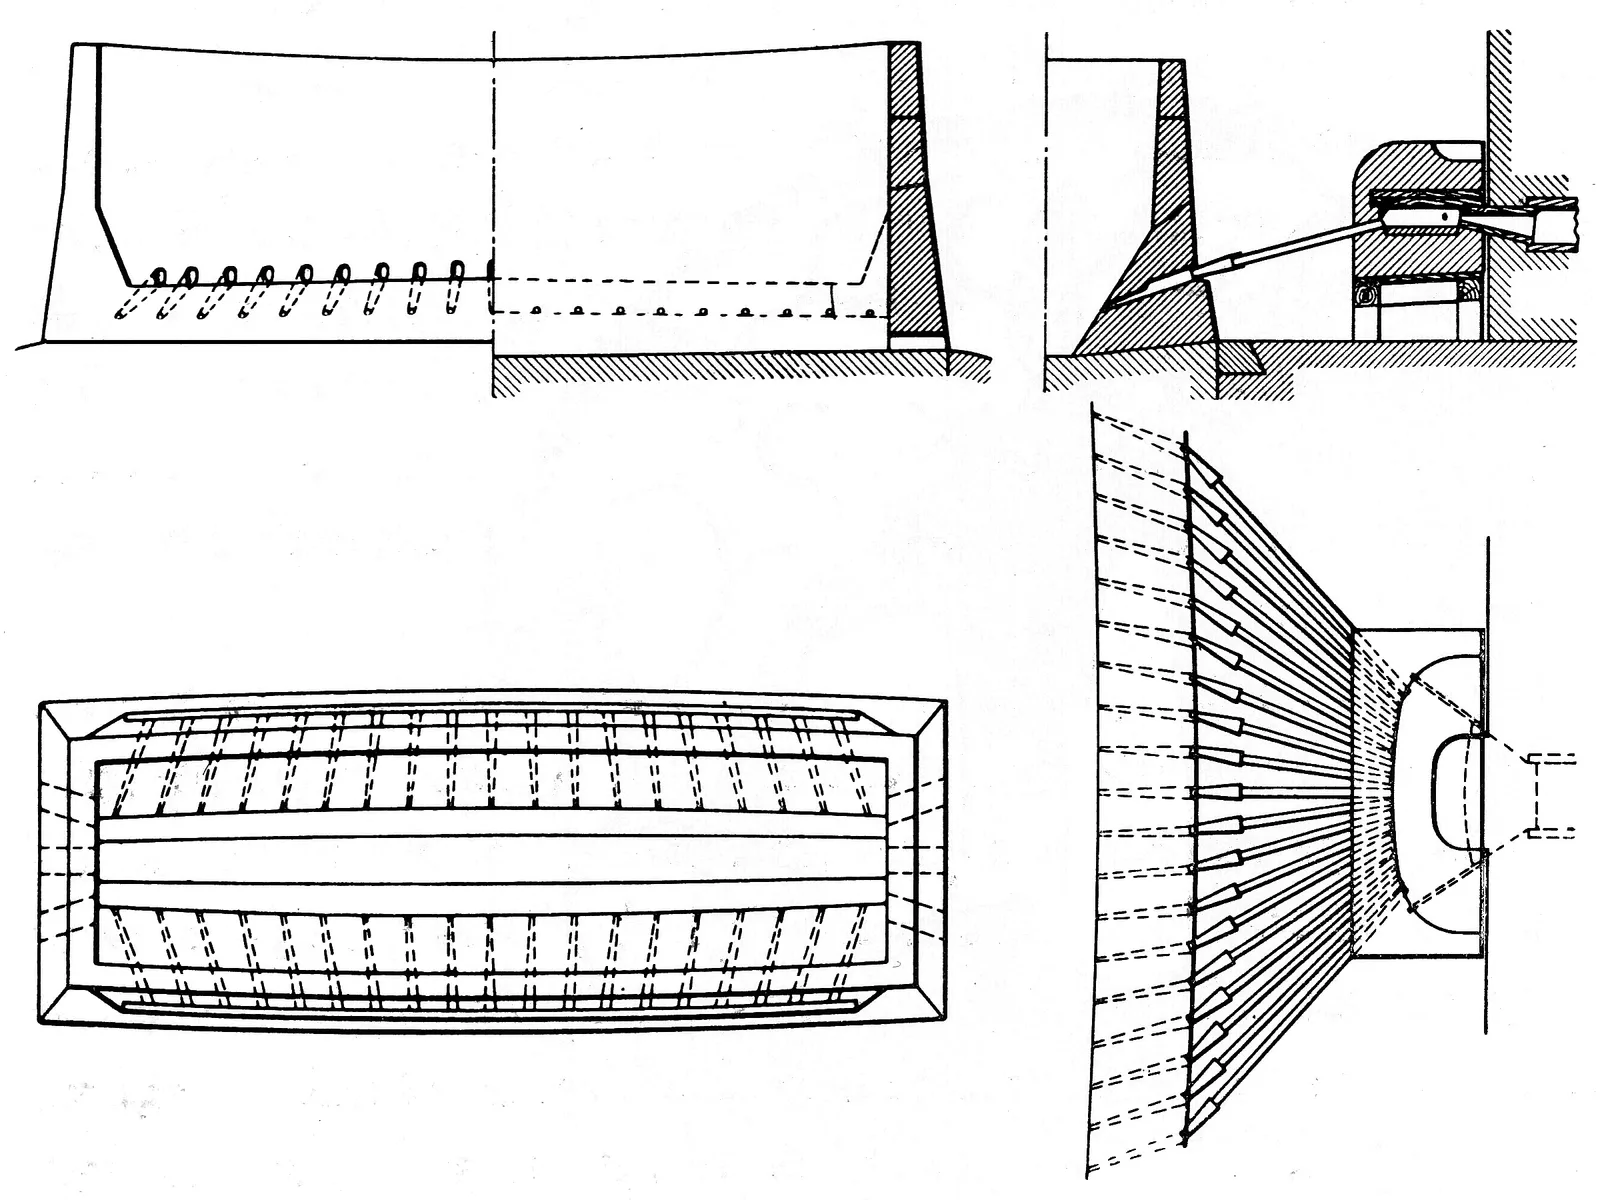
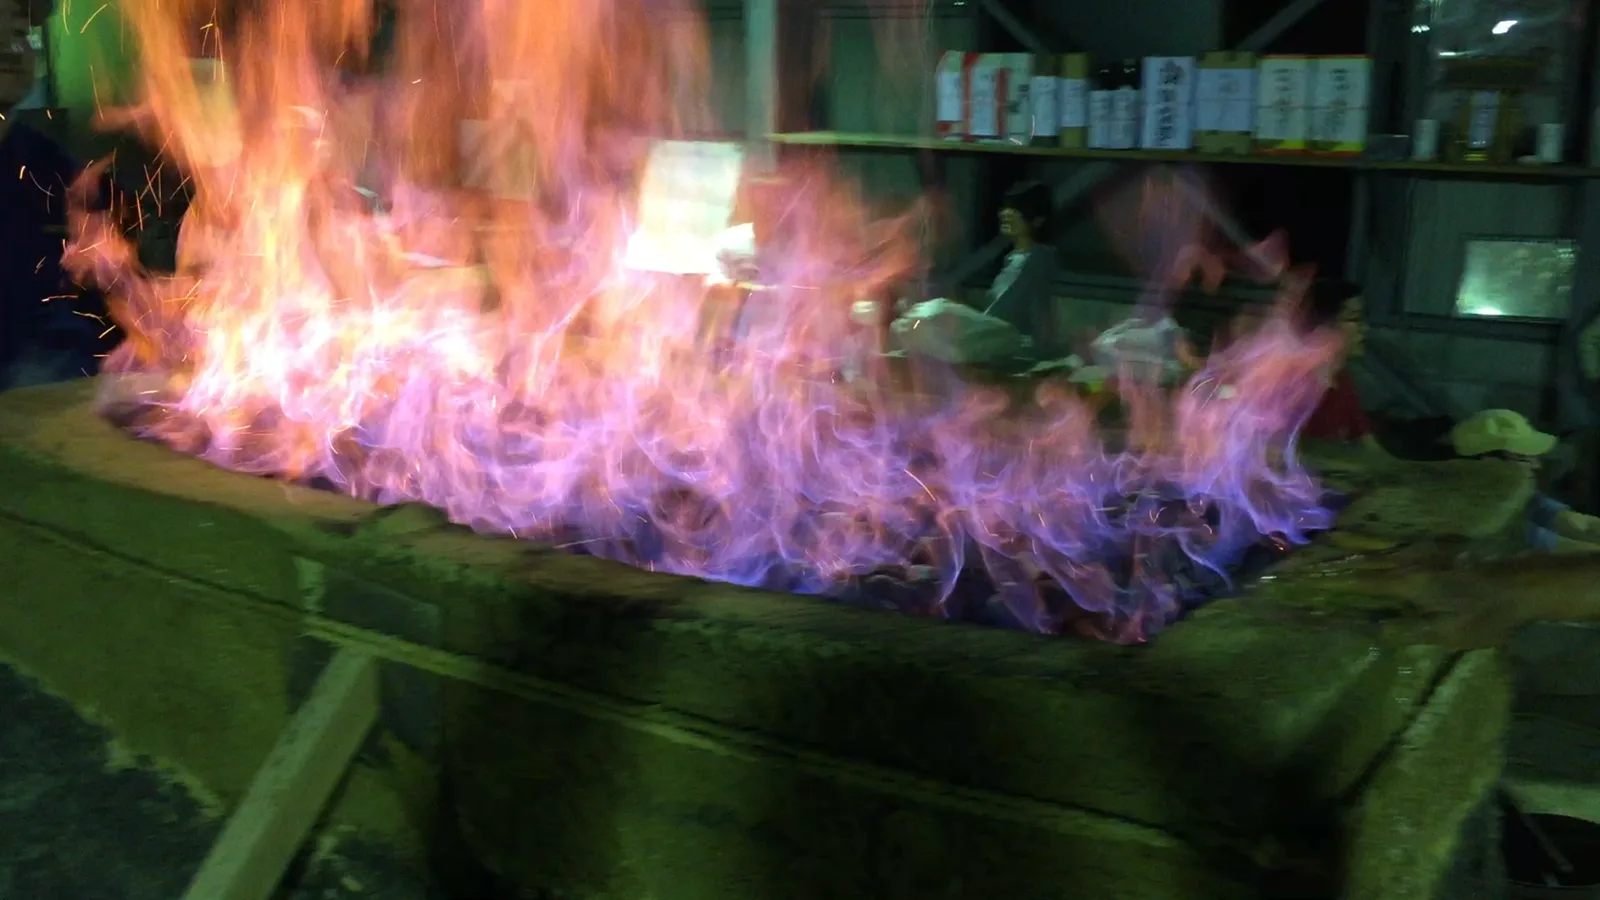
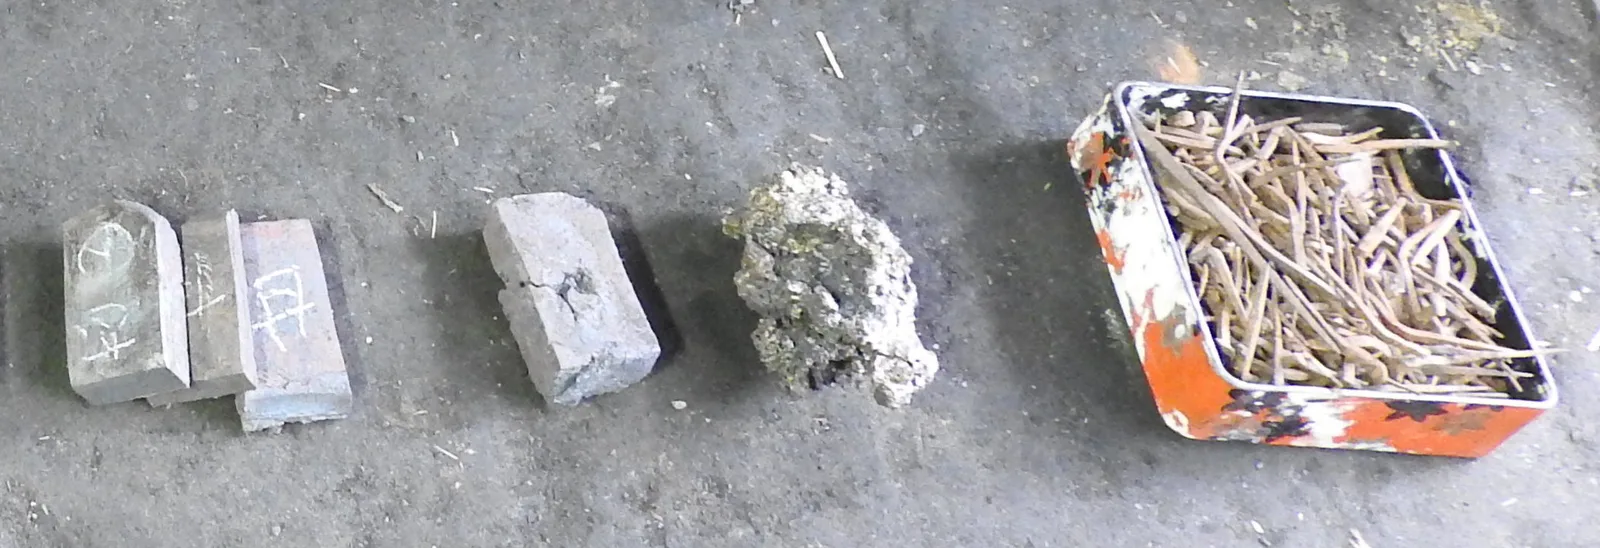
The Japanese sword begins in the sand. Satetsu (砂鉄), iron sand from rivers and hillsides, is reduced with charcoal in the tatara (たたら), a low, box-shaped clay furnace charged in layers and fed with air by bellows. The iron never fully melts: when the furnace is broken open, out comes a spongy, uneven mass, the kera (鉧), in which zones of nearly soft iron, steel and cast iron sit side by side. It is broken up, the fracture of each piece is examined and the pieces are sorted.
The NBTHK classifies the result by its carbon:
| Class | Carbon | How it behaves |
|---|---|---|
| tetsu (鉄), iron | 0–0.03 % | can be drawn out with the hammer even cold |
| hagane (鋼), steel | 0.03–1.7 % | can be drawn out with the hammer when hot: this is what is wanted |
| zuku (銑), cast iron | over 1.7 % | cannot be forged; it has to be decarburised |
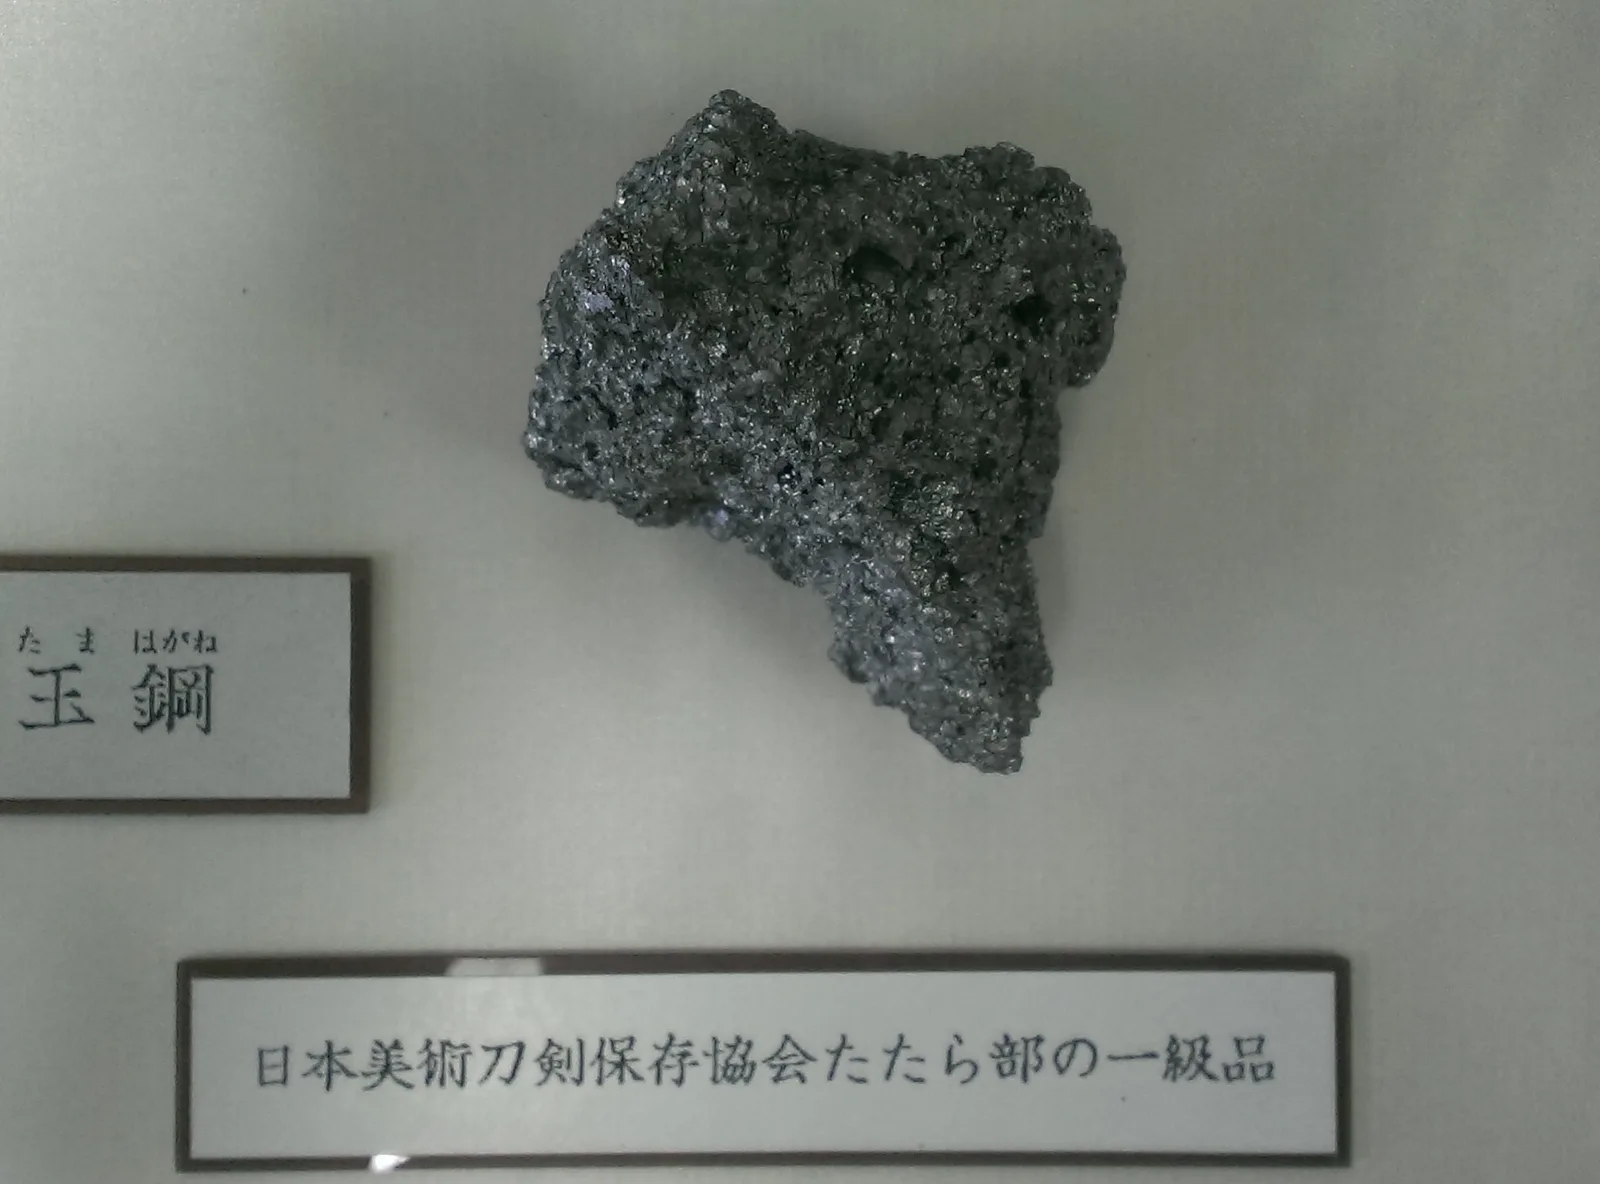
The best steel of that sorting is called tamahagane (玉鋼). According to the NBTHK, first- and second-class tamahagane holds 0.5–1.2 % carbon; the lower classes, with very uneven carbon, are used to make oroshigane (see the next section). Tamahagane is also very poor in phosphorus and sulphur, which makes it easy to weld to itself again and again during forging.
Today it comes mainly from the Nittōho tatara (日刀保たたら), the NBTHK furnace at Okuizumo (Shimane prefecture), built on the site of the old Yasukuni-tatara and first fired in November 1977. It works only in winter, a few campaigns a year, each lasting three days and three nights without a break, under a master smelter, the murage (村下). Each campaign yields a kera of about 2.5 tonnes, only part of which is first-class tamahagane. The NBTHK distributes it once a year, and as a rule only a licensed swordsmith can obtain it.
Steel and myth are worth keeping apart. The name “tamahagane” is not old: it appears in the Meiji era, when tatara steel was sold to the Navy. In Kibi, the later Bizen, iron was already being smelted in low furnaces by the middle of the sixth century, and from iron sand from the second half of that century; and the kera-oshi (鉧押し) method, which yields steel directly, is attributed to the Chikusa-hagane (千種鋼) of Harima in the sixteenth century. But how steel was made, and how it was forged, in the kotō era is not known: the “traditional” method taught today comes from Edo-period records. Amada Akitsugu (天田昭次), a Living National Treasure, held that kotō and shintō steel differ decisively, and some smiths of today, he among them, have smelted their own steel instead of working only with NBTHK tamahagane.
Some smiths go further and argue that there is nothing unique about the tatara, since smelting in a low furnace was known to many cultures, and that the fame of “jewel steel”, as tamahagane has come to be translated outside Japan, is more romantic than technical. What is historical is its industrial use: between 1933 and 1945 the Yasukuni-tatara (靖国たたら) ran 118 campaigns for army swords, producing some 50 tonnes of tamahagane in all.
The smith’s own steel: oroshigane
Oroshigane (卸し鉄) is the steel a smith makes in his own forge by lowering or raising the carbon of another material: low-grade tamahagane, old iron (nails, fittings) or old tatara iron. This lets him set the carbon he wants instead of depending only on the NBTHK distribution. Some smiths prefer it for the character it gives the steel of the blade.
According to smiths, what comes out of such a smelt is a sponge full of bubbles, slag and bits of charcoal, which has to be cleaned by folding. That is why oroshigane enters the process at the same point as tamahagane: in the stacking and folding of the next section.
In workshop practice nothing is wasted: apprentices sift the slag at the bottom of the hearth for pieces of steel that have fallen in and make their own oroshigane from them. Some smiths describe what comes out of each smelt as a sponge of 5 to 7 kg with 1.2 to 1.5 % carbon, which they clean with 8 to 15 folds, and some argue that mixing tamahagane from small furnaces with oroshigane gives a livelier steel than Shimane tamahagane alone.
Preparing and folding the steel
Before folding comes choosing. In mizuheshi (水へし) the tamahagane is flattened red-hot to about 5 mm and cooled in water; in kowari (小割り) those plates are broken into pieces of 2 to 2.5 cm. The fracture sorts the steels: the hard one snaps cleanly, the soft one bends without breaking. The NBTHK says that 3 to 4 kg of material is chosen this way.
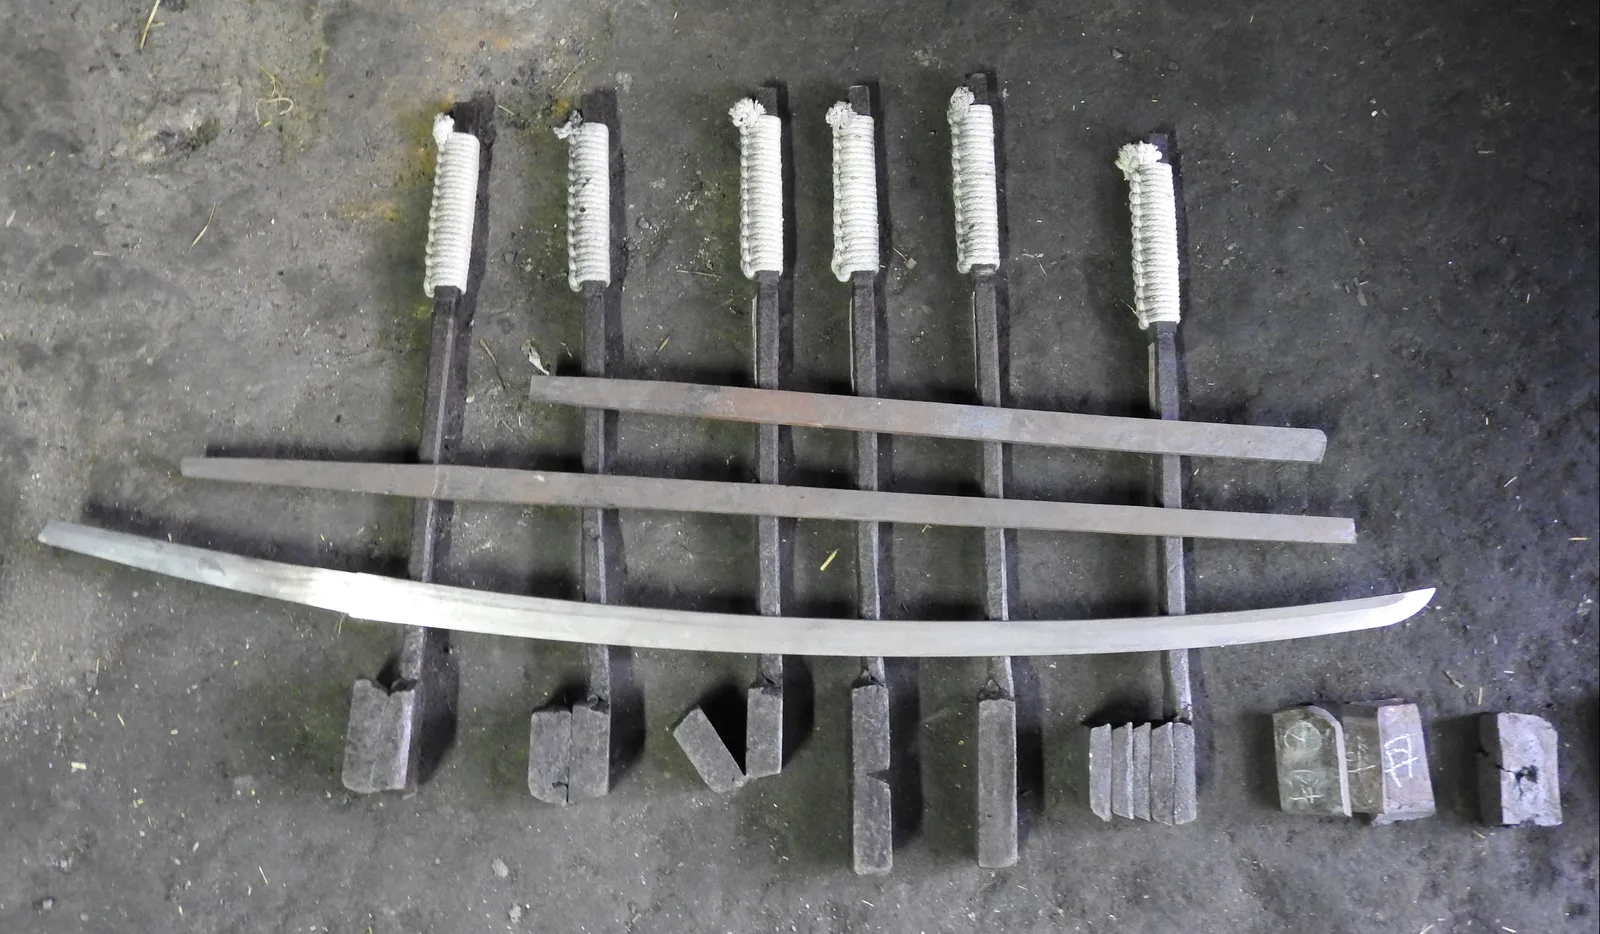
In tsumiwakashi (積み沸かし) the pieces are stacked on a steel paddle with a handle, the teko, wrapped in wet paper, rolled in straw ash, dipped in liquid clay and heated until they weld into a single block. Ash and clay act as a flux: the molten silica shields the steel from oxide scale and is driven out with the slag under the hammer.
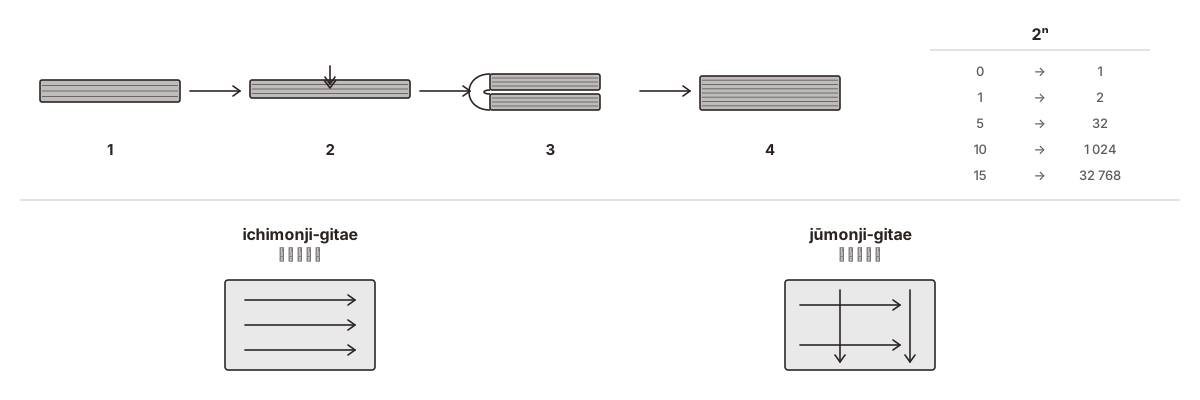
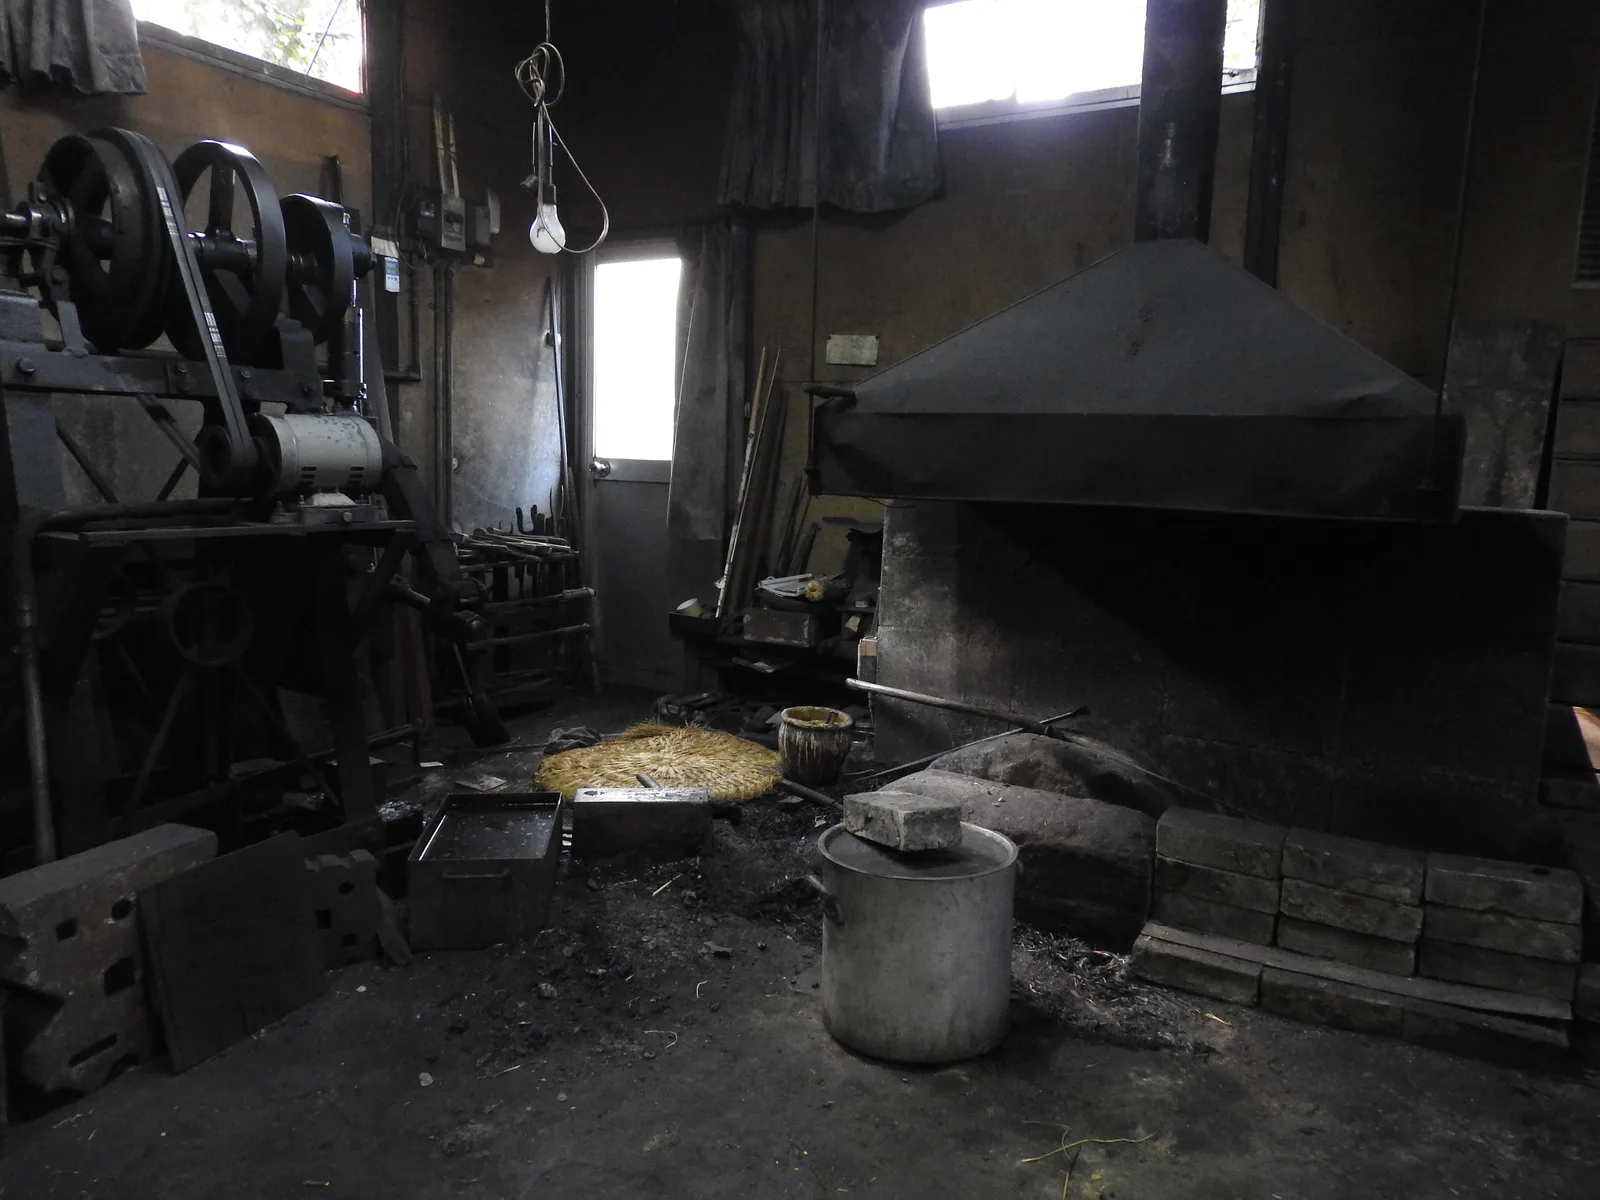
Then comes the folding, orikaeshi-tanren (折り返し鍛錬): the block is drawn out, notched across the middle, folded back on itself and welded again. The master, the yokoza (横座), holds the teko and taps with a small hammer where the next blow must fall; his assistants, the sakite (先手), strike with the big hammer. From that dialogue of blows comes the expression aizuchi o utsu (相槌を打つ), which in everyday Japanese means “to nod along”. The steel is folded always in the same direction (ichimonji-gitae, 一文字鍛え) or alternately lengthwise and crosswise (jūmonji-gitae, 十文字鍛え).
The NBTHK speaks of about fifteen folds. It calls the first half shita-gitae (下鍛え), “foundation forging”, and the second age-gitae (上鍛え), “finishing forging”. Each fold doubles the layers: fifteen give 2¹⁵, some 33,000. In the workshop not all the steel of a blade is folded alike, because the steel for the edge and the skin gets more folds than the core, and the figures vary from one workshop to another. A great deal of weight is lost on the way: the 3 or 4 kg chosen become a blade of about one kilogram.
Why so much work? Folding is not drawing. Every welding heat and every round of hammering drives out slag, closes pores and spreads the carbon through the block, which also drops a little with each fold. Workshops warn that folding too much, or carelessly, leaves the steel too soft; and folding a modern industrial steel, which is already clean and homogeneous, does not improve it: it gives it texture, but takes carbon away and can trap oxide between the layers.
Two details of the craft. When sorting, the break of hard steel is like that of a dry rice cracker (senbei), and that of soft steel like a soaked one. When stacking, the pieces that still carry slag go on the outside, where the fire cleans them best, and the best ones in the middle, so that they do not burn. Sometimes the signature itself boasts of the method: there are blades with 下鍛 (shita-gitae) or 上鍛 (age-gitae) in the mei, and others with 真十五枚甲伏造 (shin jūgo-mai kōbuse tsukuru), a fifteen-layer kōbuse attributed to Ōmura Kaboku (大村加卜) in the seventeenth century and also used by Suishinshi Masahide (水心子正秀) and others.
What the hada is and is not
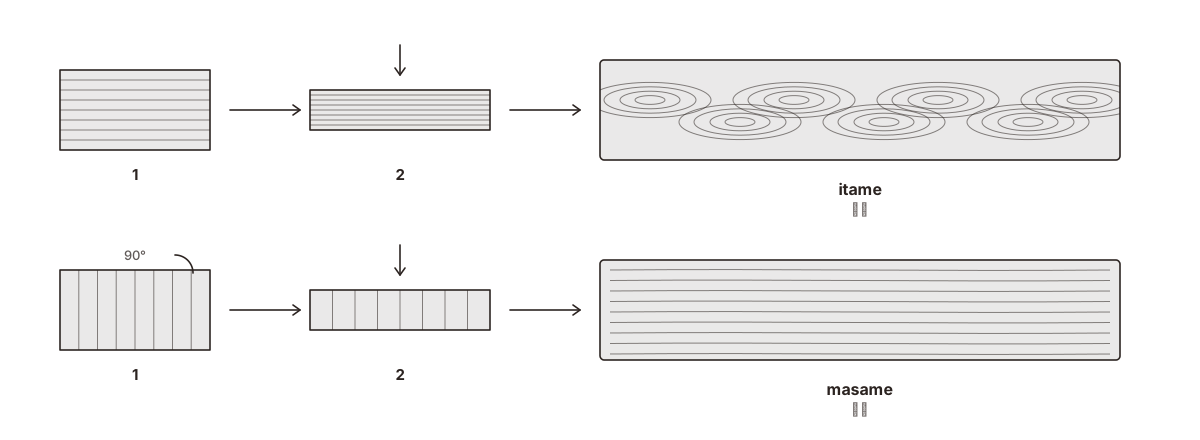
The hada (肌), the grain seen in polished steel, is the trace of the layers of folding: wherever the surface of the blade cuts the layers, each one leaves a line. For smiths it is a consequence of refining the steel, not its goal. So a showy hada does not guarantee good steel, and steel without visible flaws is not enough to call it good either: what is judged is its colour, depth and brightness, and the activity of the ji, the particles of ji-nie and the lines of chikei discussed in “The temper line up close”.
The kind of grain depends on how the layers meet the face of the blade. In the model workshops use to explain it: if the block is flattened as it lies, the face cuts the layers at a slant and itame (板目) appears, the wavy grain of a plank; if it is turned ninety degrees before flattening, the layers reach the face edge-on and the result is masame (柾目), straight parallel lines. Real blades mix the two, and the names of each variety (mokume, ayasugi and others) are in “Anatomy of the katana”.
Workshops add that part of the visible grain is not a pattern of layers but particle activity born in the quench, and polishing can bring out or subdue the hada (see “Polishing and care”): the same blade shows more or less grain depending on how it was polished.
Workshops have observed that the bold pattern of Norishige (則重) is among the easiest to imitate, and that what cannot be copied is the activity of his steel: proof that the hada alone does not tell quality. And two sister blades from the same block can show very different hada (see the last section of this topic).
Laminated constructions (tsukurikomi)
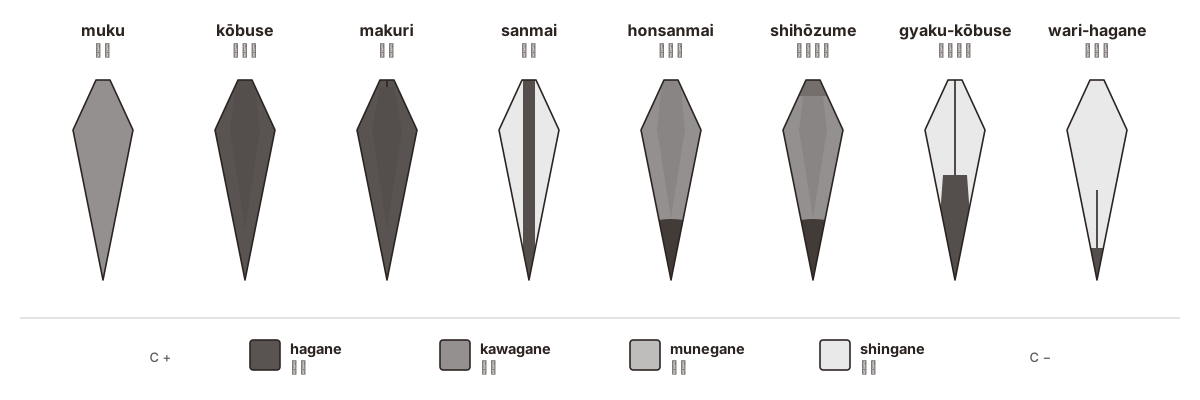
Not breaking, not bending and cutting well are conflicting demands: hard steel cuts but is brittle, soft steel holds up but bends. The classic answer is to combine steels of different carbon. Tsukurikomi (造込み) is the way they are combined, and its vocabulary names four steels by their place: hagane (刃鉄), the edge steel; kawagane (皮鉄), the skin or side steel; munegane (棟鉄), the back steel; and shingane (心鉄), the low-carbon core.
The catalogue below is the one the handbooks repeat, and it has two limits worth stating before the table. It is a model: it comes from shinshintō blades and modern workshops, which join homogeneous steels, and many old blades do not fit it. And it is not a scale of quality: no construction is better than another in itself. They are different methods, and what decides is the quality of each steel and of the work.
| Construction | How the steel is arranged |
|---|---|
| muku (無垢), also maru-gitae (丸鍛え) | A single steel. Edge and body differ only through the quench. |
| kōbuse (甲伏せ) | A skin of hard steel, bent into a U, wraps a soft core. The most often cited. |
| makuri (捲り) | The hard steel is rolled around the core and closed at the back. The result is very close to kōbuse. |
| sanmai (三枚) | A sandwich: the hard steel runs through the centre and shows at the edge, between two softer sides. |
| honsanmai (本三枚) | Hard steel at the edge, the soft core above it and skin steel on both sides. |
| shihōzume (四方詰め) | Like honsanmai, plus a steel of its own at the back: the core is enclosed on all four sides. |
| gyaku-kōbuse (逆甲伏せ) | The reverse of kōbuse: soft steel wraps a hard piece that shows at the edge. |
| wari-hagane (割刃金) | A slit is opened in the edge of a soft body and the hard steel is wedged into it. |
Sections of real blades tell another story. In 1929 Ashida Teruo (足田輝雄) drew the cross-sections of a dozen blades under the microscope, and several of them will not fit the catalogue. Amada Akitsugu, cutting badly corroded Yamato blades of the Kamakura period, found no core: only soft steel folded as gyaku-kōbuse with a little hard steel set into the edge, in the manner of wari-hagane. And the study by Kitada Masahiro (北田正弘) of a Muromachi blade signed Nobukuni Yoshikane (信國吉包) measured around 0.6 % carbon at the edge and 0.1 % at the back.
In workshop practice, to be read with the warning that the catalogue is a model, most Bizen blades and genuine Sōshū work would be kōbuse or makuri, and many modern Sōshū copies sanmai; sanmai is also seen in Hasebe tantō, in Gassan, in part of Mino and in some blades by Kiyomaro and by Miyairi Shōhei. Some attribute shihōzume to Kanemoto (兼元) and to the whole Mino school, but the section of a Seki Kanemoto drawn by Ashida is a plain makuri. It has also been observed that an off-centre core leaves a weaker hamon on one face and surfaces sooner there, and that this happens more in kotō than in shintō.
Kitada’s analysis left one more fact: the edge contained titanium, typical of satetsu, and the core did not, which points to a different raw material, perhaps imported. It fits the blades of the Nobukuni group of Chikuzen signed 以南蛮鉄作之 (nanban-tetsu o motte kore o tsukuru; “made with nanban iron”), the nanban-tetsu (南蛮鉄) that came from abroad.
The consequence for anyone looking at a blade: construction is workshop and textbook vocabulary, not something read on the surface. Except at a fracture or where polishing has worn through the skin, the structure of a particular blade is almost never visible, and no serious listing should state it without more.
The shingane and what it means to see it
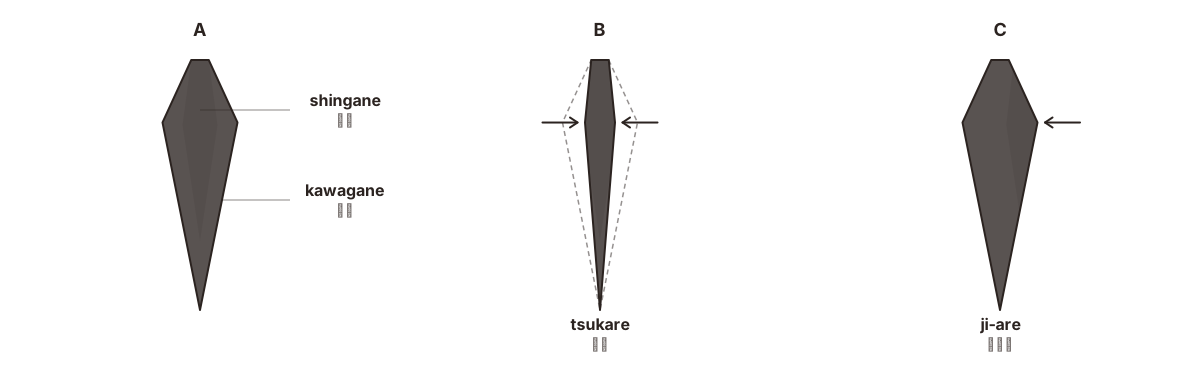
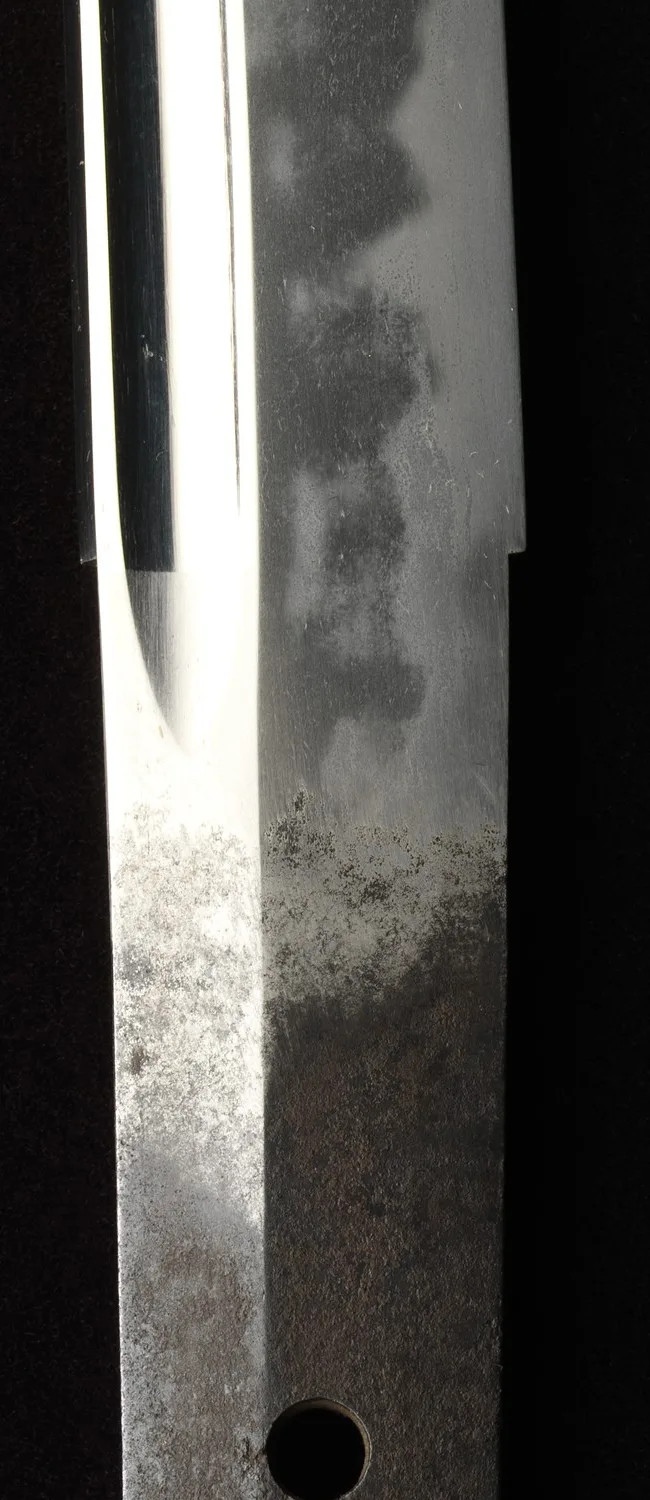
A blade with a core does not show it while the skin covers it. The core comes through when polishing, century after century, wears away the outer steel; also when the skin was thin from the start or the core was off-centre, and then it usually shows on one face only. Polishers warn that if it reaches the edge, there is no steel left there that can harden, and not even a new quench would bring back a hard edge on that stretch. It happens above all at the point, where the skin can run short when the bar is drawn out.
The Japanese market has precise words for what is seen:
- tsukare (疲れ): the “tired” blade, its underlying steel exposed by polishing or damaged by corrosion.
- ji-are (地荒れ): the seam between skin and core shows as a flaw; it matters little in use and a great deal aesthetically.
- tsukare-utsuri (疲れ映り): the core shows as a whitish haze that imitates shirake-utsuri (白気映り); it lowers the artistic value considerably.
There are, on the other hand, school traits in which the core shows and is valued: the Rai-hada (来肌) of the Rai school and the namazu-hada (鯰肌) of Aoe, dark, clean patches also called sumigane (澄鉄).
On everything else there are two readings, and this guide gives both. The market reading treats a visible core as a condition defect, the more serious the more it shows. The reading of many polishers recalls that “shingane” names a position, not a quality: in the best old blades the core is so well forged that it can barely be told apart, and what matters is the quality of each steel, not whether it shows.
Some polishers recall an Osafune Tadamitsu (忠光) whose core was more beautiful than its skin; conversely, it has been observed that in some shintō blades the core is coarse and surfaces as dirty patches. The core has also served to deceive: in Kuwana-uchi (桑名打), forgeries of Muromachi Bizen blades made in Kuwana at the end of Edo, workshops say a dark core was deliberately allowed to show to fake Bizen utsuri (see “Blade condition: flaws and deceptions”).
Shaping: sunobe and hizukuri
With the steels joined, sunobe (素延べ) draws the bar out to a length slightly shorter than the finished blade. The end is then cut on the bias and bent towards the back, so that only hard steel is left at the cutting edge of the point.
In hizukuri (火造り) the smith shapes the back, the shinogi, the edge and the tang with the small hammer, and refines the thicknesses with files and the sen, a two-handled draw-knife that shaves the steel. Smiths leave the blade with less curve than intended, because the quench will add sori (see “Shape (sugata)”). It is then gently annealed, straightened cold and given a first rough grinding before the clay goes on.
In the language of workshops and dealer descriptions, “sunobe” has another meaning too: a blade of modern steel drawn out without folding. It is worth knowing when reading the description of a guntō or of non-traditional work.
Tsuchioki and yaki-ire: what the quench does
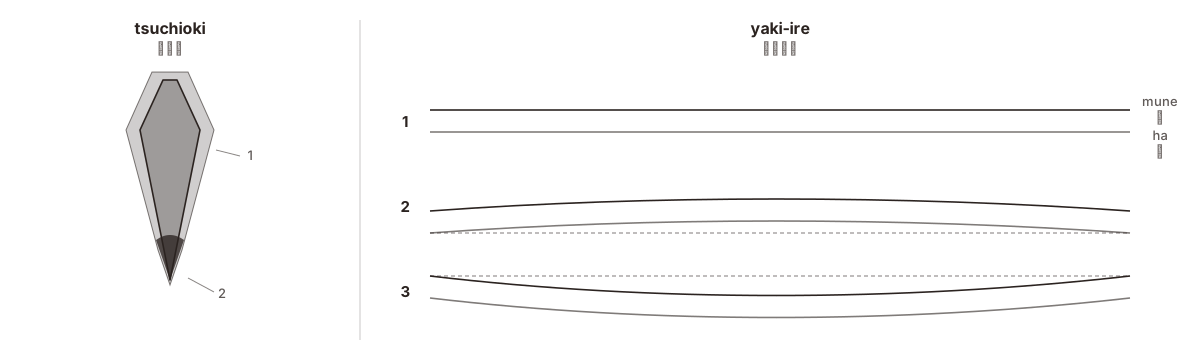
Before the quench the blade is degreased and covered with yakibatsuchi (焼刃土), the hardening clay: refractory clay with powdered charcoal and powdered whetstone, each smith with his own recipe. In tsuchioki (土置き) it goes on thin over the edge and thick over the body and the shinogi-ji. Then, at night or in half-light so that the colour of the steel can be judged, the whole blade is heated evenly (the NBTHK speaks of about 800 °C) and plunged at once into water: this is yaki-ire (焼き入れ).
That instant produces three things at once:
- A hard edge and a softer body. Under the thin layer the steel cools fast and turns into martensite, extremely hard; under the thick layer it cools more slowly and stays tougher.
- The curve. Martensite takes up more volume, the edge lengthens relative to the back, and the blade, which in the water bends for an instant towards the edge, ends up curved towards the back. That is the final curve, later adjusted with the hammer.
- The hamon (刃文), the visible boundary between the hardened zone and the rest, with its nie and nioi. How to read it is covered in “The temper line up close”.
Workshops agree that the clay governs where the blade hardens, but it does not draw the hamon on its own: the pattern also depends on the steel and the fire, and there are quenches without clay or with clay only in the area of the hamon, although today’s smiths do draw details such as ashi with it. And the hardening has depth: the hard zone is a volume, not a painted line, so as polishing wears the blade down the boundary that reaches the surface changes. A calm hamon on a heavily polished blade may be the result of wear rather than style, and the two faces of a blade may show different hamon because of uneven clay or heat, one face being more polished than the other, or an off-centre core.
The depth has been tested in the workshop. On a tantō, 1.5 mm were removed from one face: the very active chōji on that side became much calmer, and the blade bent towards the thinned face as it lost the tension of the quench. In another case, a thinned iaitō went from kawazuko-chōji to ko-midare and lost curvature. There are also hamon made different on purpose: the Konotegashiwa Kanenaga (児手柏包永), by Kanenaga of the Tegai (手掻) school in the Kamakura period, has midare on one face and suguha on the other, and takes its name from an old poem that uses that plant as the image of something two-faced. On the workshop side, some smiths leave the edge blunt, 1.5 to 2 mm thick, so that it does not crack in the water, and some argue that old schools such as Ichimonji quenched without clay, heating only the edge; it is a workshop hypothesis without documentary proof.
After the quench, aitori (合い取り) is a gentle tempering that relieves stress; it is used to correct the curve and any twist. Mind the words in English listings: the step that hardens is hardening or quenching, and tempering is this later softening step.
The quench is also the moment of greatest risk. The stress can open hardening cracks; the worst is hagire (刃切れ), a crack running across the edge, the most feared flaw. Smiths add that the same stress opens badly welded folds, and workshops say that if the blade enters the water at a tilt, an oblique shadow can remain near the tang, mizukage (水影); and utsuri (映り), the pale haze some blades show in the ji, is also born in the quench. Both are explained in “The temper line up close”. A blade that loses its hardening, in a fire for instance, can be hardened again: this is saiha (再刃), which restores function but not the original work (see “Blade condition: flaws and deceptions”).
The hi: types, endings and added grooves
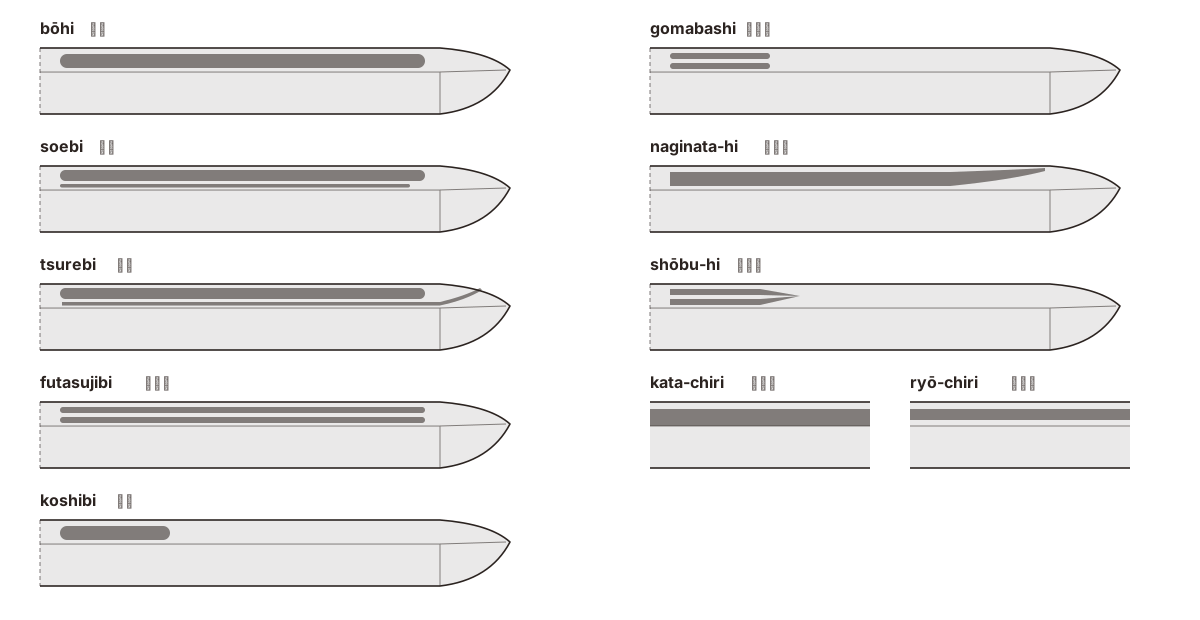
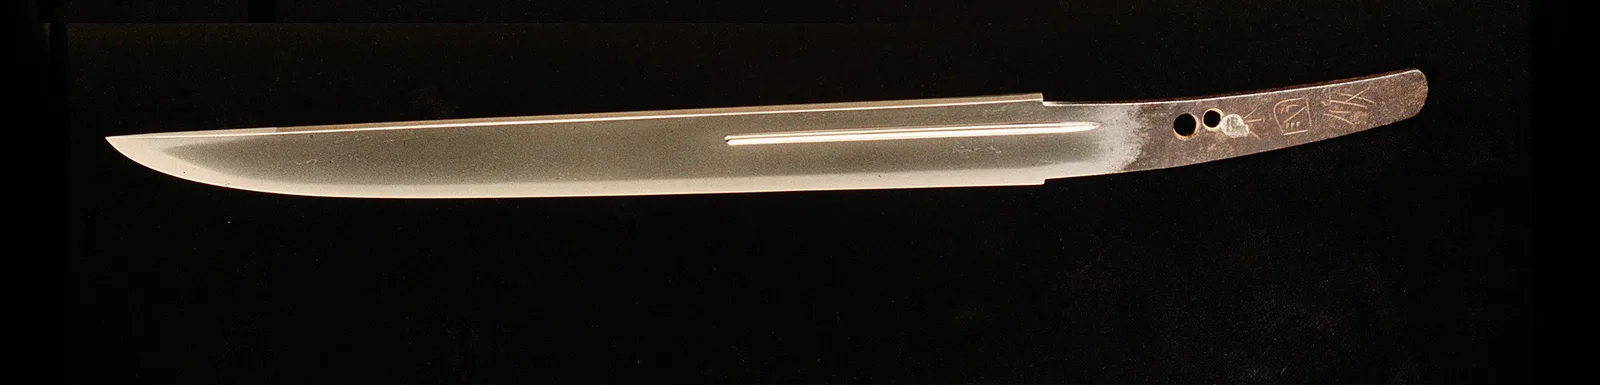
The hi (樋) is the groove that runs along the blade; carving one is called kaku (掻く). It is cut after the quench and the smith’s rough grinding, kaji-oshi (鍛冶押し), sometimes by the smith himself and sometimes by a carver, the horishi (彫師). No early source explains what it was for; the usual explanations are to lighten the blade without losing much stiffness, to decorate it, and to make it whistle as it cuts the air. Markus Sesko keeps the word horimono (彫物) for engravings and separates it from the hi, and this guide does the same.
| Type | What it looks like | What it tells |
|---|---|---|
| bōhi (棒樋) | A single wide groove. On tantō and ko-wakizashi it is called katana-hi (刀樋). | The most common. If it runs up to the shinogi and leaves a margin only towards the back it is kata-chiri (片チリ), far more frequent on kotō; with a margin on both sides, ryō-chiri (両チリ). |
| soebi (添樋) | A thin groove alongside the wide one. | Introduced by the Bizen smiths of the Nanbokuchō, at its height in the Muromachi. |
| tsurebi (連樋) | Like soebi, but its tip runs past that of the wide groove and climbs towards the back. | Popular from the end of the Muromachi, though already seen on Kamakura and Nanbokuchō masters. |
| futasujibi (二筋樋) | Two equal, parallel grooves. | Appears at the end of the Kamakura; on a clearly earlier blade it is probably added. |
| koshibi (腰樋) | A short groove at the base, almost always on one face. | Mostly on tantō and ko-wakizashi. |
| gomabashi (護摩箸) | Two short, rounded grooves, like the chopsticks of the goma rite. | Rare on tachi and katana; typical of tantō and ko-wakizashi. |
| naginata-hi (薙刀樋) | Narrows and rises towards the back near the point. | On naginata and on kanmuri-otoshi and unokubi-zukuri blades. |
| shōbu-hi (菖蒲樋) | Two small grooves that join at the tip. | Uncommon; seen mostly on tantō. |
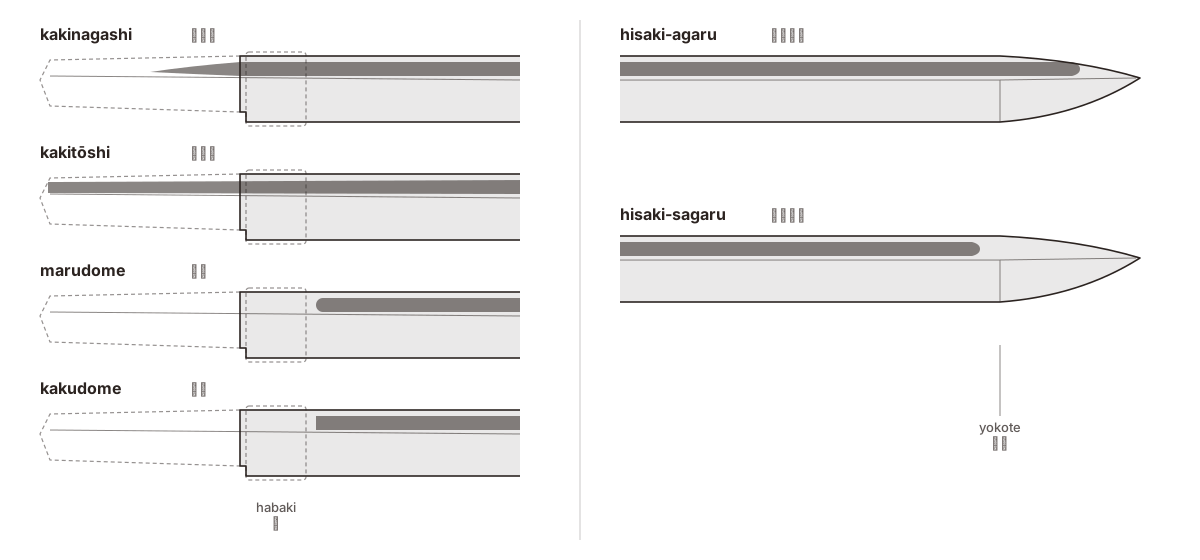
There are more variants, such as take-kurabe (丈比べ), two thin grooves of different length, or kuichigai-bi (喰違樋), interrupted or crossing. How the hi ends is also looked at:
| Ending | How it ends |
|---|---|
| kakinagashi (掻流し) | At the bottom, it tapers and fades out into the tang. This is the old form. |
| kakitōshi (掻通し) | At the bottom, it runs through the tang to its end. |
| marudome (丸留) | At the bottom, it stops in a rounded end above the habaki. |
| kakudome (角留) | At the bottom, it stops in a squared end above the habaki. |
| hisaki-agaru (樋先上る) | At the top, it passes the yokote line. More frequent on kotō, and it can also result from a reshaped point. |
| hisaki-sagaru (樋先下る) | At the top, it stops below the yokote. Typical of the mid-Nanbokuchō. |
A hi only counts for kantei if it is original. An ato-bi (後樋) is one cut later, to lighten a blade or to hide flaws such as fukure or kitae-ware; a futasujibi on a blade clearly older than the late Kamakura, or a hisaki-agaru on a reshaped point, are signs that the groove is not original.
The popular nickname “blood channel”, chinagashi (血流し), explains nothing. What the hi does do is make a bent blade harder to straighten, which is why blades without one are recommended for iai where bending is a risk; a modern test found only a slight loss of strength. In other periods it was sometimes filled with red lacquer, which polishers remove today without anyone knowing whether it had a meaning. Some also read a religious meaning into it: a bōhi or futasujibi on each face would evoke a Buddhist triad, and a koshibi the sword of Fudō Myōō (不動明王). Workshops also name other kinds found on spears, such as the shinogi-hi, thin and on the shinogi, or the zigzag kusabi-hi.
In workshop practice the blade must already be shaped on the coarse stone, the arato (荒砥), before the hi is cut; the channel is opened with scrapers, today tipped with hard metal, the tip of the hi is finished with a chisel and the whole is smoothed with shaped stones. It is harder than rough grinding, and a blunt stone leaves a blunt hi. The hi also changes over the centuries: a ryō-chiri bōhi may have been widened later until it became kata-chiri.
Sister blades, shin'uchi and kageuchi
Some workshops forge “sister” blades to see how much of the result belongs to the steel and how much to the hand. They distinguish two ways: cutting a single folded skin in two and making a blade from each half, with cores that may differ (half-sisters), or cutting an already composed block, skin and core together, in two, which gives true sisters.
Even then, those workshops report, they do not come out alike. With the same clay, one of two sisters came out harder and denser in grain than the other, through differences no one intended during the quench. A tachi and a wakizashi from the same block, made in the manner of Norishige, ended up one with a bold pattern and visible ji-nie and the other with a tight grain; they were not polished alike either, one with hadori and the other with sashikomi. And two half-sisters in three-layer kōbuse (core folded 12 times, skin 14 and an outer jacket 8) give the measure of the tiredness described in the shingane section: in polishing one lost 138 g and the other 270 g, with part of the jacket already worn away.
Forging extra blades to choose from is an old custom. For a commission the smith might make several blades; the best, the shin'uchi (真打), went to the client or the shrine, and the others, the kageuchi (影打), stayed in the workshop or were given away.
Further reading
- NBTHK · forging and polishing, step by step The NBTHK museum explains the forge from tamahagane to polishing. In Japanese.
- NBTHK · the tatara and tamahagane The NBTHK furnace at Okuizumo, its campaigns and the grades of tamahagane. In Japanese.
- Wikipedia · Tamahagane (Japanese) The history of the name, the tatara, the grades of steel and the smiths who smelt their own.
- Wikipedia · Japanese swordsmithing An overview of the process, the constructions and the metallurgy of hardening.
- Markus Sesko · the hi, type by type Types of groove, endings and ato-bi, with the smiths who used each one.
- Japanese Sword Index · blade structures Sanmai, kōbuse, makuri and shihōzume: where the soft core sits in each. In English.